
|
|
|
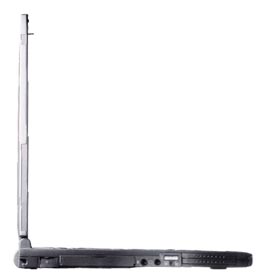
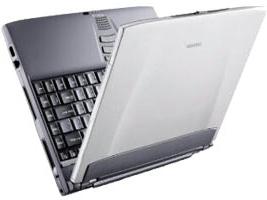
The Toshiba Portégé 3440CT did fit in all categories and the grey-silver magnesium case looks quite sexy as well :)
Some general features:
For a more detailed hardware description, please have a look at the output of lspci -vx (with the port replicator attached) and the 2.4.7 kernel's bootup messages. This is the output of lspci without the port replicator. For an even more detailed look at the configuration, this is the output of the SuSE hardware detection library hwinfo.
Basically, I was able to get Linux up and running without too much trouble and all components are supported under Linux by now. I currently run SuSE Linux 8.0 and everything except for the Lucent WinModem is supported out of the box. The only catch was the very first installation - this laptop is so small, it does not even come with a CD-ROM drive! An external USB CD-ROM drive is available separately, but I did not bother to buy that one, since I can install Linux over the network. You need to boot off the included USB floppy drive and continue the installation via the network, if you do not have the CD-ROM drive and this is what I am going to describe here. Using the CD-ROM drive will spoil the fun, since you can simply boot off the CD and start the installation. As an alternative, I've also successfully made an installation using a PCMCIA IDE adapter with an IDE CD-ROM drive attached.
Please note, that you must boot from CD2 instead of CD1 - according to Toshiba, the BIOS is not capable of booting the 2.88MB boot image on the first CD.
Starting with SuSE Linux 7.2, the installation floppies do also include the necessary USB drivers to talk to USB storage devices like the floppy drive or a CD-ROM drive. For SuSE Linux 7.1, I had to create a special boot floppy, that included the necessary network driver on the same disk, because you could not load additional drivers from another floppy disk - linuxrc could not access the USB floppy drive after the kernel had booted. You can download this floppy disk image from here - simply dump it on an empty floppy disk using dd on Linux or rawrite.exe on DOS/Windows (see a more detailed description on how to accomplish this in the SuSE Support Database), if you want to install SuSE Linux 7.1 over the network and you do not have a CD-ROM drive either.
This is the most elegant method for booting and installing Linux, since it does not require any removable medium on the laptop at all. The initial setup is a bit more complicated and requires a second running Linux system that is connected to the Laptop via Ethernet. This one will act as the installation server. I have successfully tested this using SuSE Linux 8.0, which already includes all the required components out of the box.
Basically, all you need to do is set up the following services on your running Linux box: DHCP, tftp and NFS.
label install
kernel linux
append initrd=initrd ramdisk_size=65536
prompt 0
The installation of SuSE Linux is rather uneventful - SuSE's YaST2 does quite a good job on detecting and setting up hardware like PCMCIA, Sound and XFree86. For the sake of completeness and for people using other distributions, I will describe the configuration of some components separately:
Starting with version 4.0.3 (which was included in SuSE Linux 7.2), XFree86 ships with a driver that supports the S3 Savage video chip of this laptop quite well. You can even switch between the internal and external display using the hotkeys without problems. SuSE Linux 9 even ships with a commandline tool named s3switch that enables you to switch between the internal and external display via software.
For previous versions of XFree86 4.x, I had to replace the driver module /usr/X11R6/lib/modules/drivers/savage_drv.o with a newer one available from the developer's home page. The following XF86Config configures a 1024x786@16bpp desktop. I had to remap the mouse buttons a little bit, because the system does not supply mouse button 3 - X only reports buttons 1,2,4 and 5 instead... You can have a look at the XFree86 startup messages here.
SuSE's YaST2 configuration tool uses the ALSA sound drivers by default, which include support for the built-in Intel AC97 sound controller. These are the required lines for /etc/modules.conf:
#
# ALSA Sound
#
alias char-major-116 snd
alias char-major-14 soundcore
alias snd-card-0 snd-card-intel8x0
alias sound-service-0-0 snd-mixer-oss
alias sound-service-0-1 snd-seq-oss
alias sound-service-0-11 snd-mixer-oss
alias sound-service-0-12 snd-pcm-oss
alias sound-service-0-3 snd-pcm-oss
alias sound-service-0-8 snd-seq-oss
alias sound-slot-0 snd-card-0
options off snd_cards_limit=0 snd_major=116
options snd snd_cards_limit=1 snd_major=116
options snd-card-intel8x0 snd_id=card1 snd_index=0
The SuSE Linux kernel already includes the required USB driver modules. The usb-uhci is the correct driver for this system. So far, I have sucessfully tested USB with a cheap USB web cam (using the ov511 driver), a Microsoft Intellimouse Explorer mouse device, a point-to-point USB networking cable (using the plusb or usbnet driver) and the USB floppy drive (which is supported using the usb-storage driver).
Unfortunately the laptop does not come with a built-in Ethernet adapter - the only real annoyance I could find so far. It ships with a port-replicator that has to be attached via a clumsy cable and is dangling from the side of the laptop - not really practical, if you need to carry it around. However, the ethernet chip is fully supported on Linux. You can either use the older eepro100 driver or Intel's own e100 kernel module - both are included in the SuSE Linux 7.2 kernel and run without problems.
The Linux kernel does not support the built in Lucent WinModem by default, because it requires a piece of binary-only firmware that is not available in Source Code.
Starting with SuSE Linux 9, this driver is included in the distribution as a separate package named ltmodem - you can simply configure your Modem using YaST and it will automatically detect and setup your modem correctly.
For older versions of SuSE Linux and other Linux distributions, you can download the required driver from the site mentioned below. Make sure to follow the instructions in the README files on how to compile the modules.
Some additional notes on how to compile this package on SuSE Linux: make sure, that the SuSE kernel sources (package kernel-source.rpm are installed and configured for the currently running kernel! Due to the fact, that the same source tree is being used to build different kernel images (e.g. SMP and UP), the following files must match the currently installed kernel:
/usr/src/linux/include/linux/autoconf.h
/usr/src/linux/include/linux/config.h
/usr/src/linux/include/linux/version.h
To achieve this, the easiest method is to change into directory /usr/src/linux and run the following commands:
make cloneconfig dep
Now these files should be generated with the correct values of the currently running kernel. Please note, that make cloneconfig does only work, if the cloneconfig patch is applied (it is included by default in the SuSE kernel).
After these files have been created, you should be able to compile the driver modules and create an RPM by running the following command:
CFLAGS=-I/usr/src/linux/include ./build_rpm
Now you should have an RPM, that you can simply install on the command line using rpm -Uhv <ltmodem-kv_2.4.7_4GB-5.99b-1.i386.rpm> (please note, that the kernel and driver version may be different).
PCMCIA worked out of the box for me. The kernel detects the ToPIC95 cardbus bridge and loads the required modules (I now use the kernel PCMCIA modules instead of the external drivers, the kernel picked the yenta-socket driver). I am using a NetGear MA401 wireless LAN card for some time now without problems.
No big problems here, Suspend to RAM does work very well and the battery info in /proc/apm does provide correct information. However, you should unload the ALSA drivers before going into suspend mode - otherwise sound will not work after a resume (the sound will sound "pitched"). The Linux APM daemon apmd offers the required functionality to load and unload drivers on suspend/resume. On SuSE Linux, you can configure this by editing /etc/sysconfig/powermanagement manually or via the YaST system configuration editor.
Unfortunately, I have not been able to activate suspend to disk (Hibernate) yet - this seems to require a special disk partition setup (Does anyone have a solution for this?). But the normal suspend to RAM does not consume a lot of battery power, so it is quite sufficient for my purposes. On normal use the battery lasts for about 2.5 hours, which is not too bad for a laptop of this size.
ACPI did not work for me when I last tested it. It seems like the ACPI implementation in the BIOS is not fully functional or the kernel is still lacking the correct routines to make it useful on this system. For now, one is better off by using APM instead.
Update: With SUSE Linux 9.3, I have added acpi=force to the kernel boot options to force it to prefer ACPI over APM. This works very well and the Laptop now suspends to both RAM and disk properly. Battery info is displayed correctly, too.
The built-in infrared port is supported be the toshoboe kernel module. You should be able to get FIR running by adding the following entry to the configuration file /etc/modules.conf:
alias irda0 toshoboe
Now you can configure a new network device irda0 to fit your requirements and you should be able to use IrDA networking!
More info on how to set up infrared devices can be found in the excellent Linux Infrared HOWTO from Werner Heuser.
The following links will provide you with more information on running Linux on Toshiba laptops: